

I've always had girls who come up to me and ask me to start a beauty blog and do makeup tutorials since my high school days. I must say I never really felt that I was particularly great or professional at applying makeup. I guess it's only because I started experiencing makeup at a younger age than most people and been totally in love with it since then which led me to pay extra attention to my appearance as a whole. Now, nearing the age of 25, I am still such a makeup junkie and fortunate enough, with the support of friends and family, I am able to begin a career doing things I have a huge passion for. So now I have much more time to completely indulge myself in the beauty industry and I figured if the goal of my new career is to let girls all over the world know how great a certain cosmetics brand is, why not "show" it to them?! Hence, the Beauty ChAmber blog is born =).
Enough with the babble, I will get on with the tutorial lol. So this look I have been wearing very often in the past month when I go out with friends at night or date with my hubby. It's honestly quite simple, as long as you have the right tools and products and of course, read the tutorial I'm about to teach you lol. If you would like to see the kind of products I used before reading, please scroll down to the bottom for a complete detailed list.
After cleansing your face, apply your daily skin care products and makeup primer and now let's get started on the makeup tutorial!
Step 1. Apply liquid foundation with a foundation brush. Pour or pump an amount catering to the need depending on your skin condition onto the back of your hand or a palette. I added an extra step, but you can do without it as well. I pumped a 1:2 ratio of the Bevy C. Lumiwhite Moist Up Elixir onto the back of my hand and blended the two with the brush I used is MAC 190. The reason for this extra step is to make the foundation last longer and easier to apply since my skin is very dry even in extremely humid weather. Dip your brush in the foundation and start applying with the nose and stipple with small, tight areas first. Then move towards the cheeks then the borders of your face with the remaining foundation on the brush. This sequence of application is very important in order for the foundation to look natural.
Step 2. Take your concealer and a concealing brush and cover up any flaws you may have. I used the Cle de Peau Beaute Concealer in Ivory. For very small spots or scars, you may use a cotton swab and just dab it onto the area. Smooth out any lines around it with a concealer brush. I used the MAC 194 concealer brush. I find that it is much easier to cover up very small areas this way.
Step 3. Take a concealer for dark eye circles and dab 3 times 1cm under your eyes. It is best to use a liquid concealer rather than solid to avoid fine lines. I used the YSL touche eclat radiant touch in luminous ivory. I absolutely love this product and been using it for years! It helps with the highlight and it blends very well around the eyes. It is important that if you have dry skin around your eyes, you MUST use your fingers to blend! DO NOT USE a sponge or concealer brush. The warmth of our fingers will really help to set the concealer. Gently tap the area until the 3 strokes of concealer blends together starting with the area where the darkness is most severe and maintain 1cm below the eyes. Use the remaining concealer on your finger and gently tap in the 1cm area. Don't forget the upper eyelid as well. Remember, TAP throughout this process, DO NOT RUB. I also dab a small amount on the dorsum of my nose and some on my chin to highlight those areas.
Step 3. Take a concealer for dark eye circles and dab 3 times 1cm under your eyes. It is best to use a liquid concealer rather than solid to avoid fine lines. I used the YSL touche eclat radiant touch in luminous ivory. I absolutely love this product and been using it for years! It helps with the highlight and it blends very well around the eyes. It is important that if you have dry skin around your eyes, you MUST use your fingers to blend! DO NOT USE a sponge or concealer brush. The warmth of our fingers will really help to set the concealer. Gently tap the area until the 3 strokes of concealer blends together starting with the area where the darkness is most severe and maintain 1cm below the eyes. Use the remaining concealer on your finger and gently tap in the 1cm area. Don't forget the upper eyelid as well. Remember, TAP throughout this process, DO NOT RUB. I also dab a small amount on the dorsum of my nose and some on my chin to highlight those areas.

Step 4. For those of you who have dry skin like me, it is best to use a powder brush to apply loose powder or compact powder rather than a sponge or a puff. I used Miss Hana's Powder Brush, dab onto the sponge of loose setting powder and tap the brush lightly to remove any excess powder or just simply dust off on the back of your hands. In this sequence: Cheeks -> Forehead -> Nose -> Chin -> Eye Area, brush lightly with no pressure. Use the side of the brush and go over the nose and eyelids one more time.
Step 5. On to the highlighter and shader(bronzer).Most people I know actually skip this step but I think it is vital to create the perfect finish of the face since a highlighter accentuates your features and gives your skin a lovely sheen while the shader can alter undesirable face shapes. I think of myself as having more of a square shaped face with obvious jaw lines so I think of the shading step as absolutely necessary. I used the Dior Nude Shimmer Instant Illuminating Powder in #001. This product is a limited edition from the Fall 2012 line so you can no longer buy it in stores, but I am sure you can still find it on Ebay or other online beauty shops. Apply the illuminating powder at the center of your nose downwards vertically in a circular motion, beginning at the root to the tip of your nose. Brush in circular motion as well on your forehead and chin but no more than 2-3 times or it will look unnatural. Dust across the philtrum lightly. I used NARS bronzer in Laguna and MAC 129 powder brush for shading. Please refer to the pic below for a clearer explanation. Note that the method below is for a square shaped face, the same method is not suitable for other face shapes.
Step 5. On to the highlighter and shader(bronzer).Most people I know actually skip this step but I think it is vital to create the perfect finish of the face since a highlighter accentuates your features and gives your skin a lovely sheen while the shader can alter undesirable face shapes. I think of myself as having more of a square shaped face with obvious jaw lines so I think of the shading step as absolutely necessary. I used the Dior Nude Shimmer Instant Illuminating Powder in #001. This product is a limited edition from the Fall 2012 line so you can no longer buy it in stores, but I am sure you can still find it on Ebay or other online beauty shops. Apply the illuminating powder at the center of your nose downwards vertically in a circular motion, beginning at the root to the tip of your nose. Brush in circular motion as well on your forehead and chin but no more than 2-3 times or it will look unnatural. Dust across the philtrum lightly. I used NARS bronzer in Laguna and MAC 129 powder brush for shading. Please refer to the pic below for a clearer explanation. Note that the method below is for a square shaped face, the same method is not suitable for other face shapes.

Step 5. Using the Lamsamyick Pink Powder Blush brush. apply MAC Sheer Tone Shimmer Blush in Peachykeen in a circular motion about 5 times, but DO NOT brush all the way up to the temples. If you feel the color is too light, brush downwards in a zigzag motion starting from your cheekbones.

Step 6. Now, let's move on to the eyebrows. Use an eyebrow pencil and fill in any bald or thin areas in light strokes. I used Miss Hana Waterproof Eyebrow Pencil in Dark brown. If you have thin and light eyebrows like me, it is important you buy a pencil that comes with an eyebrow brush. I personally like thicker and natural looking eyebrows so that's the brow frame I am aiming for. After you finish drawing a general frame with a pencil, go over it with eyebrow powder. I used Shiseido Integrate Eyebrow & Shadow Powder in BR731. Using the lightest color, gently go over the the area between the inner brow line and arch peak, but start at the arch peak instead, not the inner brow line. This way, your eyebrows will look more natural. Go over the eyebrow with the brush and then apply eyebrow mascara to make the eyebrows appear lighter and more natural. I used the Ettusais Eyebrow mascara in Yellow Brown. Make sure you do not get mascara onto the skin, ONLY the hairs of the brow are touched. One easy way to do this is to brush the hairs in the opposite direction then comb them starting from the inner brow line after. Please refer to the picture below if you are unclear what to do.

Step 7. From the same eyebrow powder palette in step 6, dip it in the lightest color and dust off any excess on the back of your hand. Using the brush that came with the palette, lightly contour the sides of the bridges of your nose all the way down to the tip of your nose. This helps to contour the nose and correct imperfections we may have such as a wide bridge or a round bulb nose. Please make sure you do this lightly so it doesn't look unnatural or you have too much makeup on.

Step 8. Now move on to the eyes. Curl your lashes first then apply an eye shadow primer. The eyelash curler I used is from Shiseido and the primer is from NARS. A primer is a must have if you want smoother, longer lasting and crease proof eye shadow.
Step 9. Using the Sleek Eye Shadow Palette in color STORM, dip your eye shadow brush in A (Champaign Gold like color) and apply it over your eyelids all the way above the creases of your but below the brow bones. I used the MAC 252 large shader brush. Use the excess to brush the inner corners of your eyes. Highlighting the tear duct area will give off an elegant impression to the eye. Using MAC 275 medium angled shading brush, dip in C from the Urban Decay Naked2 Palette (Chopper) and apply evenly to the crease line, blending the two colors. Using the same brush, use C from the Sleek palette and apply 1/3 of the upper lid starting from the outer corner of the eye up to the crease. The outer corner should fade out into a V shape. Remember to have patience when you do this because you want these colors to blend nicely and not blotchy.


Step 10. Gently pull your lid upward so you can see its inner rim. Line the rim with a jet-black waterproof pencil. I am using Miss Hana Waterproof Eye Gel Pencil in Midnight Black. hen line the inner rim of your lower lash line. Then line the upper lash line as close to your lashes as possible with the same pencil, extending the end about 1cm. The trick to the flick is when you close your eyes, the extra 1cm should look like a continuance of your lower lash line. Next, line the lower lash line, begin by connecting with the upper winged line, forming a point V shape at the outer corner of the eye, to the inner corner. It is very important that the closer you are to the outer corner, the thicker the bottom line gets.

Step 11. Using MAC 212 Flat Definer Brush, dip into the Color B in Sleek Eyeshadow Palette and lay on top of the upper lash line and lower lash line. Remember to press generously on the lower lash line creating a softer smoky eye look.
Step 12. Repeat the curling process in Step 8. Apply mascara to your upper and lower lashes. I Used MSH Love Liner Mascara Long. I must highly recommend this product! It truly lengthens my lashes and does not smudge, run, clog or clump no matter how many layers I apply! It is very easy to take off too with any decent eye makeup remover. I can completely understand why it was rated #1 in japan and been the best selling product for consecutive years! This is honestly the first mascara I've tried that does not smudge onto my lower eye lid in the super steamy hot and humid weather in Taiwan after walking outdoors for hours under bright burning sunlight.


Step 14. Lastly, it's the lips. Ever since the Korean drama "I Miss You" aired, everyone has been crazy over Yoon Eun Hye's gradient lips, including myself. I figured I'd try it out. I must say it is far from how good it looked on Yoon Eun Hye, but I actually like how mine looks lol. IT IS VERY IMPORTANT YOUR LIPS CANNOT BE CHAPPED OR DRY FOR THIS LIP LOOK. So always apply a thick layer of lip balm before you start applying makeup. By the time you are done with the face and eyes, your lips are ready to be adorn =). I applied a light layer of Cle De Peau concealer used in step 2 by dabbing it onto my lips. Don't worry about concealing the entire lip, just concentrate on the outer edge.
Step 15. Use a nude colored lip pencil and in this look, I used MAC lip liner pencil in Naked, and gently dot across the outline of my lips then use my fingers lightly to connect them. I am using dots instead of lines to avoid the lines looking too straight. Then I use a nude lipstick and in this look, I used MAC Lipstick in Myth and apply it to my lips while blending in with the liner. If your lips are very dry at this point, you can take a clear lip gloss or lip balm and gently apply it over the nude. Next, take Peripera Peri's Tint Lip marker in Plum and apply generously dab across the INNER LIP ONLY. Use your pinky to smooth out any lines and press/rub your lips together to make the gradient effect. AND YOU ARE DONE!~~~

Feel free to leave a comment if you have any questions about the products I used or are interested in buying or simply leaving a word of encouragement =). Also, please visit my online beauty shop's Facebook page at the link below for tons of great products updated weekly:
https://www.facebook.com/pages/Beauty-Chamber/483794205022369
Step 9. Using the Sleek Eye Shadow Palette in color STORM, dip your eye shadow brush in A (Champaign Gold like color) and apply it over your eyelids all the way above the creases of your but below the brow bones. I used the MAC 252 large shader brush. Use the excess to brush the inner corners of your eyes. Highlighting the tear duct area will give off an elegant impression to the eye. Using MAC 275 medium angled shading brush, dip in C from the Urban Decay Naked2 Palette (Chopper) and apply evenly to the crease line, blending the two colors. Using the same brush, use C from the Sleek palette and apply 1/3 of the upper lid starting from the outer corner of the eye up to the crease. The outer corner should fade out into a V shape. Remember to have patience when you do this because you want these colors to blend nicely and not blotchy.


Step 10. Gently pull your lid upward so you can see its inner rim. Line the rim with a jet-black waterproof pencil. I am using Miss Hana Waterproof Eye Gel Pencil in Midnight Black. hen line the inner rim of your lower lash line. Then line the upper lash line as close to your lashes as possible with the same pencil, extending the end about 1cm. The trick to the flick is when you close your eyes, the extra 1cm should look like a continuance of your lower lash line. Next, line the lower lash line, begin by connecting with the upper winged line, forming a point V shape at the outer corner of the eye, to the inner corner. It is very important that the closer you are to the outer corner, the thicker the bottom line gets.

Step 12. Repeat the curling process in Step 8. Apply mascara to your upper and lower lashes. I Used MSH Love Liner Mascara Long. I must highly recommend this product! It truly lengthens my lashes and does not smudge, run, clog or clump no matter how many layers I apply! It is very easy to take off too with any decent eye makeup remover. I can completely understand why it was rated #1 in japan and been the best selling product for consecutive years! This is honestly the first mascara I've tried that does not smudge onto my lower eye lid in the super steamy hot and humid weather in Taiwan after walking outdoors for hours under bright burning sunlight.

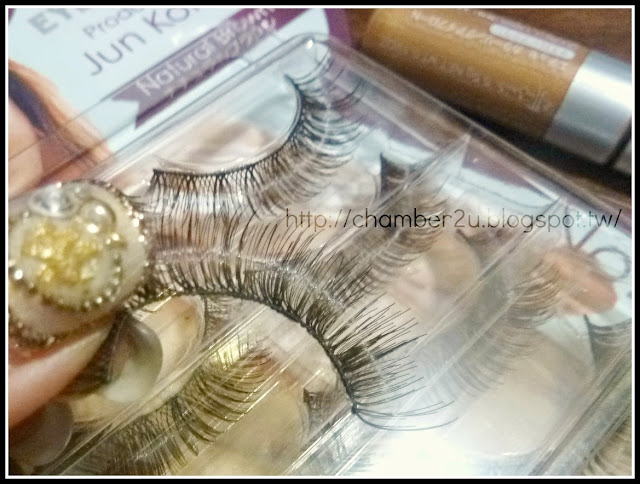
Step 13. Take a pair of fake lashes and fit them on the upper lash line and cut off any excess length if needed. I used Eyemazing by Jun Komori Style 103. After you take it out of the box, remember to use your thumb and index finger and gently pull and bend the false lash. This way, the lashes will look much more natural. Apply false lash glue to false lashes and let it stand for 15 seconds before applying them as closely to your lash line as possible with a tweezer. Remember you should leave at least a 6mm space from the inner corner of the eye or the false lashes will look extremely unnatural. Using Miss Bow Bow No Frame False Lash Curler, curl your real lashes together with the fake.


Step 15. Use a nude colored lip pencil and in this look, I used MAC lip liner pencil in Naked, and gently dot across the outline of my lips then use my fingers lightly to connect them. I am using dots instead of lines to avoid the lines looking too straight. Then I use a nude lipstick and in this look, I used MAC Lipstick in Myth and apply it to my lips while blending in with the liner. If your lips are very dry at this point, you can take a clear lip gloss or lip balm and gently apply it over the nude. Next, take Peripera Peri's Tint Lip marker in Plum and apply generously dab across the INNER LIP ONLY. Use your pinky to smooth out any lines and press/rub your lips together to make the gradient effect. AND YOU ARE DONE!~~~

Feel free to leave a comment if you have any questions about the products I used or are interested in buying or simply leaving a word of encouragement =). Also, please visit my online beauty shop's Facebook page at the link below for tons of great products updated weekly:
https://www.facebook.com/pages/Beauty-Chamber/483794205022369
PRODUCTS USED FOR THIS LOOK (FACE)

2. Giorgio Armani Micro-fil Loose Powder in #1
3. NARS Bronzing Powder in Laguna
4. MAC Sheer Tone Shimmer Blush in Peachykeen
5. Garnier Skin Renew Anti-Dark Circle Roller in Light
6. Cle De Peau Beaute Concealer in Invory
7. YSL Touche Eclat Radiant Touch in Luminous Ivory
8. Miss Hana Waterproof Eyebrow Liner in Dark Brown
PRODUCTS USED FOR EYES&LIPS

1. Urban Decay Naked 2 Eye Shadow Palette
2. Eyemazing False Lashes by Jun Komori Style No.103
3. Shiseido Integrate Eyebrow & Nose Shadow in BR731
4. Ettusais Eyebrow Mascara in Yellow Brown
The above 2 products were suppose to go in the FACE category, I misplaced them when I was taking the picture lol...
5. MSH Love Liner Mascara in Long
6. NARS Smudge Proof Eye Shadow Base
7. Miss Hana Waterproof Gel Eye Liner Pencil in Midnight Black
8. Peripera Peri's Tint Lip marker in Plum
9. Lancome Hypnose Star 24H Waterproof Volume Mascara in Noir Midnight
10. MAC Lipstick in Myth
11. Sleek Eye Shadow Palette in Storm
12. MAC Lip Pencil in Naked (Forgot to include it in the picture)
12. MAC Lip Pencil in Naked (Forgot to include it in the picture)
If you interested in buying the products used in this look and would like to place an order, please visit my online beauty store here or private message me at Beauty ChAmber's Facebook page.
Please support my shop and blog by liking my page! Million Thanks <3
Please support my shop and blog by liking my page! Million Thanks <3
pretty as always amber!!!! <3
ReplyDelete-Michelle Wu
Thanks Mi <3! Remember to contact me whenever you come back to Taiwan for a visit~~
DeleteProducts can transform a person a lot..........
ReplyDeleteJohn Phanchalad CEO JP Digital Tech have a very good track record in digital media marketing. To know more about Mr Phanchalad and latest updates on business promotion you can contact John Phanchalad http://johnphanchalad.com/about